16 October 2008

TeamSite Skill Set

To learn the skills of TeamSite CMS, knowledge of with experience in usingTeamSite must be obtained. These knowledges are categories
and rated into four skill levels below. So for example, basic low skill levels for beginners will require basic fundamental knowledge of TeamSite. The higher the skill levels, the more tecnhnical knowledge of TeamSite is required to understand.


The skill levels are as follows:

Level 0: The Developer has no knowledge of or experience in the skill/knowledge area whatsoever.

Level 1: The Developer has a conceptual knowledge of the skill/knowledge area and has some limited commercial experience or may have experimented with the related concepts and/or supporting technologies in a non-commercial sense. The developer cannot apply this skill/knowledge area without direct supervision.

Level 2: The Developer is proficient in the skill/knowledge area with recent commercial experience in its application, can apply the skill/knowledge without direct supervision, but has insufficient experience/knowledge
to provide direction to others in the given area.


Level 3: The Developer can be considered an expert in the skill/knowledge area with considerable recent commercial experience in its application, with experience providing mentoring/guidance to others. The Developer has a detailed and broad understanding of the skill/knowledge area.

Note that each level described above subsumes all levels below it. Thus, in order for a TeamSite Developer to rate at Level 3, he or she must meet the criteria for Levels 1, 2 and 3.


The following area of TeamSite knowledge a TeamSite Developer need to obtain are broken down into each levels below:

Level 0

Introduction to Content Management System (CMS)
  • Can describe the definition of TeamSite
  • Can describe the features of TeamSite
  • Can describe the definition of CMS
  • Can describe the purpose of CMS
  • Can describe the content development life cycle
  • Cam describe the definition of an asset


Introduction to TeamSite Concept
  • Can define TeamSite server architecture
  • Can define TeamSite terminology like for example: i)
    Content stores ii) Branches ii)Workareas iv) Edition and Versionin v)Can describe the definition and what are the roles in TeamSite vi)Metadata vii)Can log in to a TeamSite server
  • Can describe and demonstrate and use the features in each version of ContentCenter User Interface

Level 1

Editing files

  • Can do simple and advance search for assets
  • Can describe and use TeamSite VisualPrevew tool
  • Can describe and use Local File Manager to edit files
  • Can describe and perform basic file operations like copy, rename, delete, create, move/rename, import/export and modifying properties of a file
  • Can view and set metadata
  • Can describe and demonstrate checking in/out a file and able to perform merges

Introduction to Workflows

Can describe the workflow terminology use in TeamSite, like for example understand the following:

  • Workflow
  • Job specification
  • Workflow Moder
  • Workflow template
  • Task
  • Activation
  • Transition
  • Links
  • Understand the difference between serial and parallel task
  • Workflow events

Introduction to Forms Publisher

Can describe the forms publisher terminology use in TeamSite, like for example understand the following:

  • Data Capture Templates (DCTs) / Data Capture Forms
  • Data Content Records (DCRs)
  • Presentation Template (PTs)

Level 2

Workflow Development

  • Can describe and demonstrate how to configure and set up out of the box workflows templates and workflow models
  • Can describe and demonstrate how to design, implement and deploy a workflow using the Workflow Modeler Tool
  • Can describe and demonstrate how to design, implement and deploy a customise workflow template using XML and Perl script

Form Publisher Development

  • Can describe and demonstrate how to develop Data Catpure Forms
  • Can describe and demonstrate how to develop Presentation Templates
  • Can describe and demonstrate how to use APIs and Command Line with Data Capture Forms

OpenDeploy

  • Can describe and demonstrate how to configure Open Deploy tool to deploy files to production server

Level 3

Advanced Workflow and Form Publisher Development

  • Can describe and demonstrate executing external programs
  • Can describe and demonstrate creating custom data source
  • Can describe and demonstrate using external database with Data Catpure Forms

TeamSite Administration

  • Can describe and install or upgrade TeamSite CMS, TeamSite Search, MetaTagger and Open Deploy
  • Can describe and demonstrate the process of configuring and reindexing TeamSite Search
  • Can demonstrate the maintenance process of creating, deleting, updating users, groups and roles in TeamSite
  • Can describe and demonstrate the process of backing and restoring content store
  • Can describe and demonstrate diagnosing error message with log files
  • Can configure file virtualisation in TeamSite

29 April 2008

Configuring .NET ASPX File Virtualization for TeamSite

The following configurations are necessary to successfully virtualize content from aspx files on a TeamSite Server where the .NET Framework is also installed on the same server.

Prerequisite

  • Add the ASPNET user to the "TeamSite Web Preview" Group.
  • Ensure that .NET framework version 2 is already installed in the same server box that runs TeamSite.
Details

If you are using Windows 2003 the following must also be done (until Bug 57146 has been fixed):
  1. If IIS was installed before you installed TeamSite then you need to delete the default website. Rename the current default website (e.g. “default website bkup”) and click the “Stop” button for the backup default website to stop IIS from running. Then create a new one (also name it “Default Web Site”), using port 81, set path to c:\inetpub\wwwroot and configure it for anonymous access using the IIS IUSR_ user. Click the “Start” button on the new created default website.
  2. Go to Default Web Site properties->ASP.NET tab and check the the .NET version. If there are two version of the .NET framework in the selected drop down box, select version 2.0.xxxx
  3. Go to Default Web Site and Add the SSI ISAPI filter as follows
  4. Right click Default Web Site > Properties > ISAPI Filters > Add, give a filter name like "iwrewrite" and point to \lib\iwproxy_isapi.dll
  5. Within the IIS Management console, under “default website” create a new virtual directory called "iw-mount" which points to the Y:\ drive directory. Anonymous access to this directory should be the TSIMP_ user.
  6. For the root directory (iw-mount), click the “Configuration” button and check the configuration of the defined application to ensure that at least the extensions ".aspx" points to the version 2 .NET framework of aspnet_isapi.dll. Further extensions pointing to this are asax, ascx, ashx, asmx & axd.
  7. Check in the Web Service Extensions that Active Server Pages and ASP.NET are enabled.
  8. Do step A to C **
  9. Set full permission to everyone on the C:\WINDOWS\Microsoft.NET\Framework\v2.0.50727\Temporary ASP.NET Files folder
  10. Restart IIS and run “iwreset –a”
  11. You should now be able to run a simple ASPX. (just take a simple HTML page and rename it .asp/.aspx.
  12. Log into TeamSite and view a ASPX page.
  13. If you receive and error like "Access denied to 'Y:\default\main\WORKAREA\test, Failed to start monitoring file changes" then you need to check that all necessary parts of ASP.Net have the correct permissions as per Microsoft Knowledgebase articles 317955 & 316721. Interwoven KB article 53298 may also help to identify the problem.
  14. If all the steps are successful, then delete the old default web site that was renamed in step 1 (optional).
    The "C:\Inetpub\wwwroot\aspnet_client" directory contains JavaScript files used by .NET, and is automatically installed with the framework.

To enable the virtual system to locate this directory you may need to add a virtual directory at the root of the Workarea:

  • From within the IIS console, navigate to the Workarea (i.e. "\iw-mount")
  • Right-click on the Workarea; Select New > Virtual DirectoryEnter "aspnet_client" as the Alias
  • Enter "C:\Inetpub\wwwroot\aspnet_client" for the Directory
  • Use the default permissions

* *Ref:

A. From within the IIS console, navigate to the Workarea (e.g. "\iw-mount\default\main\uam\WORKAREA\load")

B. Right-click on the Workarea and click on "Properties", Under "Application Settings" click on "Create" button.

C. Restart IIS.

Further reading:

See knowledge article # 49749

17 April 2008

TeamSite Upgrades


TeamSite Upgrades Overiew

The overall plan for TeamSite (TS) upgrades are as follows:

Day 1

  • Perform back up procedures
  • Perform prerequisite requirements
  • Upgrade TeamSite and OpenDeploy (OD) with latest patch for TS and OD
  • Apply new licenses

Day 2

  • Upgrade TeamSite Search
  • Configure TeamSite Search
  • Fix any upgrade issues
  • Re-run toolkit.ipl for any UI customization

Day 3

  • Check accounts and permissions
  • Check basic functionalities works in the new upgrade of TS
  • Perform system testing
  • Test form publishing (DCT, DCR and PTs)
  • Test workflows
  • Test OpenDeploy and Data Deploy
  • Test View->My local files
  • Fix any issues found in testing

Day 4

  • Reserve day for fixing any upgrade issues

Bug upgrade report for TS v6.7.1 with SP1
There is a bug report with using VisualFormat editor in TS v6.7.1 Service Pack 1. When a user previews a Data Capture Form that has a text area field using Visual editor, an error pop up page will appear. Use TinyMce instead of using VF as a work around solution.
Latest patch installer for TS v6.7.1 SP1 has glitches with previewing a Presentation Template on the TS server that runs with a Semantic Anti-virus. Skip the step for installing the latest TS patch.


Prerequisite

  • Back up the entire hard drive of where TS server and Search server was installed (e.g. if TS was installed at c:\interwoven, then backup the entire c drive).
  • Back up the entire iw-store. If iw-store was stored in a separate partition drive, then back up that entire drive.
  • Get Administrator login account details from the client.
  • Get Interwoven support login account from the client.
  • Notify TS users of outage.
  • Disable all antivirus software/services temporary on the TS and search server (if any), particularly if server has a Semantic virus running, as it will cause problem with new TS installations or upgrades (See knowledge article xx)
  • Check and confirm what current version of TeamSite is installed on all the server boxes that will be upgraded. This is done either by:
    Control panel->add/remove program; or
    Check iw-home\iwinstall\iwov-inventory.xml file
  • Download the relevant TS installation package software from Interwoven support website.

Upgrade instructions
The existing TS.lic license key used for TS v6.5 file would still be valid and useable after the upgrade. So there is no need to generate a new TS license key.

The upgrade path for various TS version on Windows OS is as follows whether the upgrade was on the same or on a different server box:

TS v6.5 upgrade path

  • Upgrade from v6.5 to v6.5 SP 2 (if haven’t done so)
  • Upgrade from v6.5 SP2 to v6.7.1
  • Upgrade from v6.7.1 to v6.7.1 SP1
  • Install only latest patch for v6.7.1 SP1

TS search v6.5 upgrade path

  • Upgrade from Upgrade from v6.5 to v6.5 SP 2 (if haven’t done so)
  • Upgrade from v6.5 SP2 to v6.7.1
  • Upgrade from v6.7.1 to v6.7.1 SP1

OD upgrade path

  • Install OD Base Server v6.1.1
  • Install OD Admin Server v6.1.1
  • Apply latest patch to OD server
  • Install OD receiver v6.1.1
  • Apply latest patch to OD receiver
    *Note: OD v6.1.1 is more stable to install than v6.2


TeamSite Upgrade steps
1. Download the following installer from Interwoven support site:

  • TS v6.7.1 installer
  • TS search v6.7.1 installer
  • TS v6.7.1 SP1 installer
  • TS search v6.7.1 installer
  • Patch update for v6.7.1 SP1


2. Login as Administrator on the TeamSite server machine
3. Backup all configuration files (*.cfg and xml files)
4. Manually stop all TS services and set them to manual on start up
5. Confirm step 4 by going to DOS prompt and type “netstart amore” and look for Interwoven port number
6. Manually stop all IIS
7. Install TS v6.7.1

  • Select “mssql” checkbox and select the SQL JDBC driver file (*.jar) from iw-home\TeamSite\eventsubsystem\lib folder
  • Select “No” for don’t overwrite existing jmsconfignew.xml file


8. Reboot server
9. Log into TeamSite via the internet browser and make sure that you can successfully login in
10. Run iwaccessmigrate with –m & -bg –n parameter
11. Run “iwreset –a”
12. Login into TS to ensure that TS is running after performing step 10
13. Manually stop all the TS services
14. Install TS v6.7.1 SP 1
15. Install the latest patch

  • Manually stop all TS services
  • Run the patch installer


16. Reboot server and login to TS to ensure that it is running
17. Check that event subsystem service is running
18. Decide whether the client will be using either TinyMCE or VisualFormat editor for published form.

  • If using VisualFormat (VF) editor, there is a required additional step to install client visual format on the entire client’s machine that will be using published forms. Location of visualformatclient.exe installer is found at C:\Interwoven\TeamSite\httpd\iw\ewebeditpro20\clientinstall folder. You can customize the VisualFormat toolbar by editing the visualformatconfig.xml file at iw-home\httpd\iw\ folder. (for more information read Form Publisher Developer Guide 6.7.1 release PDF doc)
  • If using TinyMCE, the advantage is that it is already installed with TS because it’s a Java app. However VF is more powerful than TinyMCE. The toolbar can be customized by editing custom_config.js

19. Run script (toolkit.ipl) to migrate any customize UI (if there are any UI customization)


Note:

  • Read the installation log file at c:\iwinstall\log folder for any unsuccessful installation
  • Read TS server log file iwtrace.log at iw-home\teamsite\local\logs folder
  • Read iwutid_cmdout.log file for any PT error message provide iwutild.cfg file debug mode enabled


TS search server upgrade steps
Note: If the search v6.5 was installed on a separate server box, then upgrading the TS server can be done independently without needing to wait for TS upgrades. So to save time TS Search upgrades can be simultaneously run in parallel with TS upgrade.

  1. Run TS search v6.7.1 installer on the search server box and install it at c:\interwoven\search folder
  2. Locate and enter the TS server host. Ensure that you can firstly ping the TS server host name to confirm that both search server and TS server box can communicate and ping each other
  3. Locate the shared file system. Usually at iw-home\new folder (create a new folder)
  4. Check that the search service are running
  5. Install the search v6.7.1 SP 1
    * Manually stop the search service
    * Run the installer
  6. Reboot the server
  7. Check that all search services (i.e. Interwoven TS Search & Index) are both running
  8. Configure the search
    * Edit iw-home\cssdk\cssdk.cfg file: Uncomment
    # search.server.host: localhost
    # search.server.port: 6720
    # search.server.maxConnectionLimit: 10
    * Edit iwseach-home\etc\branch.cfg file and add the branches that you want to index
    * Restart search and index services (Stop in order search and index. Start index and then search service)
    * Run CTL:
    iwndxlistbr - Display the list of branches that are index
    iwndxrefreshbr -b /default/brachname…
    iwndxrefreshbr –I /default/branchname.. (Incremental update on real time)

OD upgrades steps
Upgrade the following OD v6.1.1 in this order below.

  • OD base server
  • OD admin server
  • OD receiver server

1. Get a OD license key

  • Go to DOS command
  • Run java -cp od-home/lib/odng.jar com.interwoven.license.LicInfo
    -f output-file -p OD
  • Login the Interwoven support site and go to the OD generate license key webpage
  • Enter the server information generated into the form and submit it

2. Back up a copy of all files from iw-ODhome\config and etc folder.
3. Download v6.1.1 of OD base, admin server and OD receiver installer from Interwoven support site.
4. Stop all previous version of OD services
5. Run the OD base installer. Install it at c:\interwoven\ folder
6. Choose “upgrade” select box from the installation dialog screen
7. Follow the installation instruction on the screen to install it
8. Check the email that will receive the OD license key file
9. Copy OD.lic to iw-ODhome\etc folder
10. Reboot server
11. Check that OD base service is running (i.e. 62 services). If not, then restart it and set to automatic startup

12. Run the OD admin installer on the same server box that had OD base installed in step 5 and follow its instructions
13. Reboot the server
14. Ensure that OD admin server is running

15. Apply latest patch for OD server. Read the README.txt for further instructions on installing the patch. Basically the instruction will instruct you to:
* Stop all OD services
* Run the patch installer
* Update the registry
16. Reboot the server
17. Check that all OD services are running. If not then set OD services to automatic and start the OD Interwoven services (i.e. AccessService, UI admin and 62 services)

18. Run the OD receiver installer on the other receiver server box
19. Choose “upgrade” option box from the installation dialog box
20. Apply latest patch to OD receiver
21. Get OD receiver license key


Post installation

  • Enable the Symantec antivirus is back up and running after the whole TS installation package have been installed. Set the antivirus services back to automatic start up.

09 April 2008

Part 4 - Installing TeamSite Front-Office

Overview
TeamSite Front-Office (FO) is a interface tool that allow users access to their workarea & TS functionality within Windows explorer or Microsoft Office applications (e.g. MS Word) . FO consists of 2 components:


  • TeamSite Front-Office Server: Works with your TeamSite server to provide a framework for contributing content from development applications directly to TeamSite.


  • TeamSite Front-Office Client: A client-side application that enables content contributors to access TeamSite features directly from their development applications. This component includes the application plug-ins, the TeamSite Briefcase, and the TeamSite Front-Office Configuration Wizard.


Both of these 2 components will need to be installed individually, i.e. FO server is to be installed on the server that runs and host TS. The other is to be installed on the client's machine.

Installing & Configuring Front Office Server
The instruction below will be installign the latest version of FO version 5.6.6 at the time of writing this blog.

  1. Before you install FO server, ensure that all workarea branches and users with their roles has been added into TeamSite and that the users/group has been appropriate permission to access the workarea.
  2. Before you install the FO Windows server, you must have local Administrator
    privileges because the installation process needs to start and stop the iwwebd
    service.
  3. Download the FO server and client software from Interwoven support website. TFO_server566Buildxxx.exe & FTO_client566Buildxxx.exe
  4. Install Front -Office server (v5.6.6) on the server that had TeamSite install, by running TFO_server566Buildxxx.exe. Installation path shall be c:\interwoven\TeamSite Front-Office\ folder
  5. Configure users and workarea in iw-home\conf\iwwa.cfg file to give FO user(s)/group access to a workarea.
  6. Configure iw-home\etc\iw.cfg file under "[FrontOffice]" section.
  7. Configure iw-home\local\config\wft\available_templates.cfg file to add out of the box FO workflows (see availiable_templates.cfg.tfo.example) if submit operations from FO triggers a worflow, i.e. iw.cfg had "wf_submit=yes"
  8. Configure index_template.htx if FO auto-index is enabled in iw.cfg. Then copy the index_template.htx file to each directory within a workarea that you want to index.
  9. Reset Teamsite server with "iwreset -a" command in DOS prompt.

Installing and configuring Front-Office Client

  1. Run FTO_client566Buildxx.exe software on each client's machine that will be using FO.
  2. Follow the instruction on the setup screen.

Further reading
1. Front-Office Admin Guide (PDF version)

08 April 2008

TeamSite Search Overview


Overview

The primary use of TeamSite Search is to find a file for:

  • view, editing, copying & reuse

  • removing outdated file
  • reporting purposes

  • recovery purposes


There are other reasons why a user would want to use the search facility in TS but the above points are the common reasons for using a search.


Architecture
Search facility is made up of 2 parts:

  • Index manager/server :- Controls indexing of content. Also uses a document cracker that looks into the content of a file or data record and provide metadata and full search content on it.

  • Search manager/server :- Performs queries on indices and returns the search result to queries. TS interface communicate with the search manager to request searches and to view the search results.

Both index and search server uses query agent, which is a processor use to perform indexing or querying documents.


So for example if you search for a content (case sensitive search), you send a query to the search manager. The search manager scans a search index for files that match your query, and returns a results page. The results page lists matching files in order of relevance.


There are two types of search methods in TS that user can do:


  1. Simple searches :- Before you can initiate a simple search, you must first navigate into an area on a branch
    that is indexed for search. A simple search query returns documents that contain any of your keywords. Phrase matching, wild cards, and Boolean logic—the use of “and”, “+”, “not”, “-”, and other operators in a search query—are not supported by simple search but is supported in advance search
  2. Advance searches


Configuring search
Search engine can be configured by editing either of the 4 files located in iwsearch-home/etc folder


  1. branches.cfg - Config file to tell the index manager which branch is to be index during startup time

  2. search.properties - Config file to tell the index and search server/manager which set of files is to be index when a user submits a set of fiels through TS.
  3. FieldMapping.xml - Allows additional attribute fields that will be indexed by the index manager.

  4. search.xml (located at: iwhome\httpd\webapps\conten_centerweb-inf\conf\search)


NOTE: Any update of the 4 search configuration fiels above will require a server reboot to take affect.


branches.cfg
Provide search feature to control which branches will be index - See http://support.interwoven.com/library/manuals/teamsite/html/671/ts.adminwin/search4.html

search.properties
Provide search feature such as:
  • Partial index

  • Controls how many files are submitted to be indexed at a time

  • Controls which files will not be index

  • Control size of file that will be index

  • Enable/disable index update whenever a file is submitted

See - http://support.interwoven.com/library/manuals/teamsite/html/671/ts.adminwin/search7.html


07 April 2008

Part 3 - Installing OpenDeploy


Prerequiste


  1. Ensure that the server that will have OpenDeploy install meets the system requirement according to the release note.

  2. If OpenDeploy is installed on a Windows OS, ensure that you DOS-compatible 8.3 format file names is enabled. Click here for further instructions.

  3. Ensure that NO other windows application is using RMI registry port 9173, because OpenDeploy will by default uses port 9173 and will need to run this port alone. There will be conflict issues if other non-Interwoven product uses port 9173. Search for port "9173" in the Windows registry system and in the file system to check if other applications uses this RMI port.

  4. You must have Administrator privileges to install OpenDeploy on your Windows server.

  5. Close all other open applications before installing OpenDeploy software on your
    Windows server.

  6. You must close the Services window (not just minimize it) prior to installing
    OpenDeploy on a Windows host. Otherwise, the Windows registry keys will not get
    updated properly.

  7. Go to Interwoven support site (you must have an existing support account), login and download the 3 latest release vesrion of OpenDeploy, i.e. Base server software(IWOVopendeployBaseFull.6.x.x.x.x.Buildyyyyy.Windows.exe), Receiver software(IWOVopendeployRcvr.6.x.x.x.x.Buildyyyyy.Windows.exe) & Administration package software(IWOVopendeployAdmin.6.x.x.x.x.Buildyyyyy.Windows.exe)

  8. Teamsite is already installed on the server.


Installation

OpenDeploy (OD) has 3 software components, each of which must be installed on the
appropriate server. Here are the components:

  • Base server software - this is the software which controls the management of
    deployments on the source server. This software permits the OpenDeploy server to
    send and receive deployed files.


  • Receiver software - this is the software that must be installed on each server
    designated only for receiving deployed files. Servers with the base server software
    installed do not need the receiver software.


  • Administration software package - Combine software with the reporting server (software for managing the storage and publication of event-based reports) and ContentServices Foundation (CSF) access service(software for authenticating individuals who will access OpenDeploy base servers or receivers through the
    browser-based user interface or web services)


  1. Install the base server software (see PDF link under "Further reading" section below for instructions) on the server. Accept all default values.

  2. Reboot the server.

  3. Install the administration software package. Accept all default values.Then reboot the server again.

  4. Ensure that the 3 OpenDeploy services are running, i.e. Interwoven "OpenDeploy service", "OpenDeploy SNMP" and "OpenDeploy UI Admin".

  5. Open internet browser and login to the UI admin webpage at http://:8081/iw/opendeploy/login

  6. Login using the bootstrap user account (usually the administrator) that was created during the administration installation. **

  7. Add appropriate users who will need access to OpenDeploy admin UI.
  8. Install the receiver software on the destination server that will receive the deployment.
  9. Obtain a license key by sending a request email to Interwoven support (see "How to obtain a license key" for more details)

**Note: If you are having problem logging into OD admin UI, with message saying something like "invalid user and/or password", then check deploy.cfg and look that the bootstrap user and domain name are correct. If not, you can edit/add another valid user from AD/LDAP. Save the deploy.cfg if there are any changes and restart all the 3 OD services.


How to obtain a license
Obtain a batch license activation for OpenDeploy base and receiver servers, i.e. an individual base server license key and receiver licensing. Licensing for OpenDeploy Administration is not required.

  • Base Server license: You can license your OpenDeploy base server software to operate as one of the following options,i.e. i)full feature version with no time limit; or ii)EasyDeploy, a restricted feature version with no time limit. So tell Interwoven Support which license option you want.
  • Receiver License: You must license and activate each OpenDeploy receiver installation. An expired
    receiver will only accept incoming license deployments.


Further reading


Part 1 - Intro To Using MetaTagger

Overview
MetaTagger is a automated process of tagging enterprise business content with descriptive metadata. How? MetaTagger accomplishes this by generating precise, accurate metadata associated with a particular document. In this way, solutions to business problems can be addressed by better organization and use of an institution’s content.

Advantages:
  • Metadata is useful for organizing, surveying, retrieving, and controlling access to content. It helps transform a loosely content into a efficient library catalog. Well-designed metadata can improve Internet or intranet search capabilities, portal personalization, and content distribution. With MetaTagger, you can tag enterprise assets quickly and consistently.
  • MetaTagger helps transform a loosely-organised content repository into a highly efficient library. MT allows you to share, manage, and resuse electronic content by analysing that content, identifying key concepts and organising that content in customised ways.

Example scanerio


Webcast: MetaTagger 4 Developer Introduction
1. PDF
2.
Video (Download the videio player from webEx site)


Further reading

  • MetaTagger v4.1.1 User Guide (HTML version)

06 April 2008

Part 2 - Installing MetaTagger


Prerequiste
See http://support.interwoven.com/library/manuals/metatagger/html/411/mt.410.admin/install3.html

Installing MetaTagger
The instruction for installing the MetaTagger Server are below:

1. Download the base release MetaTagger software (metataggerverxxbuildxx.exe) from the support site with your login account. Note that this base release already comes with Administration, MetaTagger and Studio server component.
2. Follow the instruction here to obtain license key and install it on the server for Windows OS.
3. Go to http://hostservername:9080/ciadmin/ and login as "admin" for both username and password (default user name)
4. Change password for default admin user and add appropriate users to MetaTagger (Click here for more instructions)


Configuring MetaTagger
For further reading, see http://support.interwoven.com/library/manuals/metatagger/html/411/mt.410.ref/server_config.html#wp1000069


MetaTagger Architecture
Click here for diagram.


Further reading

24 March 2008

Part 1 - Introduction to Forms Publisher


Overview

  • TS FormsPublisher (FP) is a ECM development template tool that automates the process of creating content using data capture forms and presentation templates. It is not a production tool because the capture data and presentation templates don't get deploy to production server; ii) FP component is on development workarea and generates the content page there. FP plays no part in executing any code (e.g. JavaScript) contain in the generated page (if any).
  • Can generate any type of content file e.g. web, graphic and media articles
  • The generated output file type format can be any format (defaulted to a text files), such as HTML, XML, JSP, WML, ASP and other file format types.
  • In ContentCenter Pro, user can use various commands from the menu to create and manage forms and templates: File->New Form Entry; Actions->Generate Page / Regenerate Page
  • Advantage: No Web Developer expertise or skills required to create web content. So FP is used by power users. ii) Does not require real time content composition, i.e. content generated on the fly (e.g. DHTML, ASP page)

Term

  • Forms: Use to enter data into form entries, which store unformatted information. It can have many types of data entry fields. Some fields are madatory. HTML markup is supported with inline editor.
  • Form Containers: It is a container that group like fields together into a framed box. A container can also have multiple sections called replicants. Replicants allow more than one item of the same type, e.g 2 paragraph fields for the same story field. Use replicant controls to add,delete and move fields around the form as needed.
  • Data Capture Templates (DCTs) - Also known as Data capture forms, it is datacapture.cfg configuration XML file that defines the data capture form for each specifc data type. The goal is to i) defines the data type itself (such as what information the data type will contain and parameters that define what type of TeamSite FormsPublisher data is legal in any input field); and ii) to present form for data entry and capture info, which will be stored in a XML DCR file. A datacapture.cfg file also specifies the look and feel of the data capture form displayed in ContentCenter. Each data type has a datacapture.cfg file, located in templatedata/category_1/data_type_1 folder and use an external DTD lcoated at IWHOME\local\config\datacapture6.0.dtd
  • Data Content Records (DCRs) - is a XML file containing content records that has been entered and save by a content contributor through the data capture form use to capture data. The DCR can be setup to name a content contributor automatically. The DCR file is stored in each data type located at templatedata/category_1/data_type_1/data folder There are 2 formats for DCRs, i.e. iwov (TS ver 5 and earlier) and xml (TS 6 and later)
  • Presentation Template (PTs) - It is a file that defines how captured data will be formatted and appear when it is displayed as the output result. A presentation template is populated with a data record that was captured earlier (through a data capture template) or from queries to databases. It can be an XML file but can also be created in other format. PTs are stored in templatedata/category_1/data_type_1/presentation folder


Data Store Hierarchy

FormsPunlisher uses the following branch hierarchy in TS below:


Note: All template files are stored in a workarea under a directory named, templatedata


Configurating FormsPublisher
The FormPublisher in TS server needs to be firstly configured for each new workarea and template, prior to implementation as the folder structure is not created after installing TS.

  1. Define template data types
  2. Create a templatedata (default name but can be changed by setting the name with the data_root value in [teamsite_templating] section of iw.cfg) directory branch in a workarea (if one does not exist). Templatedata directory tree must not be deployed outside TS because it is used only as a workarea during development.
  3. Create a unique one to many category name directory 1..n under the templatedata folder.
  4. Create a data type directory under each category directory because there can be many data types for each category.
  5. Create one data and presentation folder under each data type folder. The data type directory will contain all the DCRs created for that tempate and presentation folder will contain all PTs for that type.
  6. Add a new entry in *template.cfg file for each category.
  7. Create a new datacapture.cfg file for each data type (templatedata/category_x/datatype_x/ folder)
  8. Create a new presentation template file in each presentation folder (templatedata/category_x/datatype_x/presentation/ folder)


* Configuration Files
Template.cfg is global XML file that resides outside TS file system in iw-home/local/config and specifies the following below. For more information about its format, read "Configuring Template.cfg".
  • Defines the type of data record being produced (iwov or xml).
  • Defines the data categories and types that are available for use with FormsPublisher.
  • Specify the presentation templates that can generate HTML files on which TeamSite
    branches or directories.

  • Specify the presentation templates that can be used with a specific data type.

  • Define the specific users or roles with permissions who are allowed to create or edit data records for a specific
    data type, thus making it possible to restrict access to certain template.

  • Define the location of the presentation template used for previewing generated HTML
    files.

  • Whether auto-DCR naming has been set for this data type and category.
    Whether renaming is allowed.

  • How the form looks, including buttons that display, whether there is a navigation tree, and what style sheet is used

TS has a utility program call iwxml_validate.ipl wich can validate XMl files. Syntax: iwxml_validate.ipl filename.xml. This utility program needs access to the DTD for the file being tested. Easier approach is to copy the required DTD from iw-hoe/local/config to the same direcotry as the file is being tested. Note that this tool can only be used while logged on to TS server.

FP Development Process

Resources
For further details, read: TeamSite FormsPublisher Developers Guide v6.7.1 SP1 or the PDF version

18 March 2008

Part 5 - Implementing The Workflow Modeler


Pre-requistie: Read introduction to Workflow Model


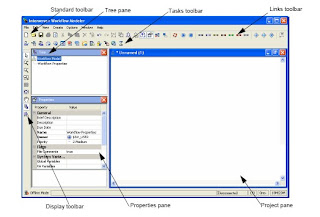
Workflow Modeler GUI


  • Toolbars: Provide acess to commonly used features. All features are available through the menu system.

  • Tree: Provides a method to quickly select any object (model, task, link, etc) by name. The selected object is highlighted in the digram.

  • Properties: Display the property settigns for the currently selecteds object, and enables modification of property values if it is a read/write property

  • Project pane: A visual representation of the workflow model. Using the toolbar, user can select new types of objects, drop it on the project pane and select the object to set their properties.


Note

  • All object names must be unique

  • Link names are used as transition button labels

  • Some object names are used as labels on UI form e.g. user, group and metadata task. ii) links with user, group, review or metadata predecessor


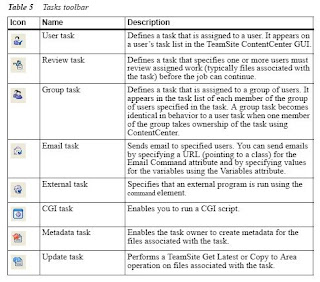
Review Task & Links

  • Must have one sccess and one failure link

  • May have additional default links, which will appear as additional transition options

  • Success and failure link can have any name

  • Use available groups and/or available user to define sets of possible reviwers for this task

  • Then use Available Reviews to define the actual selection list of reviwers, which is use to generate a selection list on the job instantiation form

  • Number of reviewers must be define in design time

  • Use the Label and Description field to configure the form appearance of this select list

Group Task

  • Have Shared By property instead of an owner property. So enter a set of users and groups to send this task to.

  • One of them will take ownership and perform the task


Metadata Task

  • Use to display the metadata input form but appearance will depend on its configuration setting.

  • User then enters a metadata for the files in the workflow.

  • Set immedate property to true to allow it to open the metadata form as soon as task becomes active

Lock Task

  • Attempts to lock all job files associated with a workflow However it can't lock files that are already locked outside the workflow

  • Has two transition, i.e. Success (taken when all locks are acquired) and failure (taken when any of the locks can't be acquired) which is required

  • Can transfer between task owners for files locked within its own tasks

  • Use external task calling unlock.ipl to unlock files


External Task

  • Non interactive task that runs as an external application or script on TS server.

  • Runs as SYSTEM user on windows OS or runs with userid of the task owner on UNIX server.

  • Use the external task to execute unlock.ipl script to unlock files. Unlock.ipl does not acquire any arguments.

  • Properties: i) Command - Full path of the executable or script to run ii)Retry - Successive attempts to re-run program again upon failure to start after a specific time whose value can be specified in iw.cfg

  • When workflow calls external task program, it passes data as command line arguments, including job and task ID, area vpath and list of job files.

Dummy Task

  • A time delay task that transitions to other tasks after some amount of delay time or a specific time

  • Use it in a time delay if a lock task fails, before it tries to lock the file again.

  • Must have one timeout transition where the timeout transition's time delay can be absolute or relative.

  • Any task can use one or more timeout links in addition to any other links.

Update Task

  • Used to copy files to another area but only files associated with the job are updated.

  • Equivalent to Get Latest if source is a staging area or a Copy To if source is another workarea or an edition

  • Area vpath is the destination area

  • Properties: i) Delete - propagate deletion of fiels to destiniation area; ii) Overwrite - Overwrite conflicting versions in destination area; iii) Source Area VPath - area from which files are copied

E-mail Task

  • Use to send notification to users via email
  • Generates a message notifying a user that a task has been assigned to them with information about that job

Special properties:

  • Email command: $IW_HOME/iw-perl/bin/iwperl/
  • Email body: author_iwmailbody.tpl
  • Email body text: author_textbody.tpl
  • Email header: author_iwmailheader.tpl

To configure and use email task you must:

  • Identify compay'es SMPT server and domain name
  • Configure iw.cfg file under [iwsend-mail] section
  • Set up an email_map.cfg file in iwhome/local/config/wft/solutions folder

Variables

  • Variables allow the job creator to enter workflow or task property values when the job is created

  • It can be used as property values for any object types

  • There are 7 variable types:

1. Configurable variable: Value entered by the job creator via the form when the job is started. Configurable variables can be local to an object or global to the entire worflow model.

  • Use local variables when you want to enable the job creator to select a specific task owner, area vpath or other single property of one task.

  • If a value will be used in more than one task, use global property

  • To define local configurable variable: Select a task object proeprty->description. Then select "configurable" from variable type drop down list. Enter a label value (will be displayed on the instantiation form). Entering and ID is optional as system will automatically generate a unique ID Recommend leave this default value for local variable. Description field is use for displaying a tooltip help icon. Click OK button

  • To define global configurable variable: Select workflow object property->global variable. Then select "configurable" from variable type drop down list. Enter a unique ID value. Enter a label value. Click Add button. When finish click OK button.

2. System variable: Dynamic value which is automatic created and set by the workflow system, when a workflow starts. Can use it as default or property values. All system variable name are uppercase and begin with "$IW_"


3. Script variable: Variable use to generate a more complex value using JavaScript. Enclose system variable in quotes (e.g. "$IW_USER"). Don't use return to return a value; the script variables value will be the result of the final evaluation i nthe script.


4. Datasource variable: Vaue calculated by an external Java class.


5. Extended attribute variable: Used to set extended attribute data on files.


6. Macro variable: Values used to set extended attribute during workflow.


7. Task variable: Used to pass data along from one task to another task as a job executes.

Resources
For further details, read Workflow Modeler User Guide

Part 4 - Introduction to Workflow Modeler


What is a Workflow Modeler?
A Interwoven workfllow modeling tool that allows user to:
  • Create workflow model and validate it
  • Create tasks
  • Draw transitions between tasks
  • Deploy workflow model to TS server

System Requirements

  • Windows 2000/XP/2003

Using the Workflow Modeler

The steps required to begin using the Workflow Modeler are as follows:

  1. Implement a methodology to design a workflow model (analyse requirement, risk, etc..)
  2. Identify the workflow elements discovered during step 1. The elements are: i)workareas ii)files iii)jobs iv) tasks v) transitions vi) variables
  3. Design a workflow diagram based on step 2.
  4. Implement the design from step 3 using Workflow Modeler
  5. Test and debug the workflow
  6. Deploy to TS server


Workflow Model Features

  • Configurable variables
  • Data sources to pull data
  • Support of system variables
  • Scripting variables
  • Conditional execution of tasks [Conditional Link]
  • Global and local scope of variables

Server side enhancements including:

  • Customizable Instantiation Screen using DCT framework
  • Customize workflows for different branches
  • Web view of the workflow from Content Center
  • Current status of the workflow
  • Debug support

17 March 2008

Part 2.1.1 - Configurable Workflow Settings


All three configurable workflows share the following functionality:


  • Email Notification

  • Metadata Capture

  • Deployment


The configurable_author_assignment and configurable_author_submit workflows also add the functionality to have submitted files reviewed by a configurable reviewer. The reviewer section of these workflow configuration (.cfg) files is where the email notification system obtains instructions to determine the email address of the reviewer.


Note: The configurable_author_assignment workflow also adds the functionality to attach files to a workflow task.


The general procedure for configuring these options is the same for each of the configurable workflows:


  1. Open the workflow_name.cfg file that corresponds with the configurable workflow you want to implement.


  2. By default, these files are located in iw‑home/local/config/wft/solutions.


  3. Edit the entries that correspond with the functionality you want to enable.

  4. Save and close the file.

  5. Ensure the workflow is activated as described in Enabling Workflows.


The following sections describe each of these options in detail.


Part 2.2 - Configuring availiable_templates.cfg


The available_templates.cfg file is an XML configuration file that lists all of the workflow templates that are available for use on the TeamSite server. For each workflow, this file indicates the name of workflow, the location of the workflow template file, and the conditions under which the workflow is available.

By default, the available_templates.cfg file is located in:

  • C:\Program Files\Interwoven\TeamSite\local\config\wft (Windows)
  • /Interwoven/TeamSite/local/config/wft (UNIX)


  • Note: If available_templates.cfg is edited and contains non-ASCII text, it must be saved in UTF-8 encoding.


The available_templates element is the container element for the file. This element contains the following attribute:


  • require_workarea — specify whether (true) or not (false) workflow templates selection screen will include a branch/workarea chooser if workarea context is not present. Most of the out of the box workflow template examples require this to be enabled (require_workarea="true") to work properly. Default value is false.


Within the available_templates element is the template_file element:


<available_templates require_workarea="true">
  <template_file name="Author Submit Workflow"
    path="solutions/configurable_author_submit.wft">
    ...
  </template_file>
</available_templates>


The template_file element has the following attributes:


  • name — specify the title of the workflow, for example:
    name="Author Submit Workflow"
  • active — indicate whether (yes) or not (no) the workflow template is enabled. Default value is yes.
  • path — specify the path where the template file resides. Template files must reside in one of the following locations:

    • iw‑home/local/config/wft/default
    • iw‑home/local/config/wft/examples
    • iw‑home/local/config/wft/solutions


    • The value you specify is relative to the iw‑home/local/config/wft directory, so if the template file resided in the following absolute path:


      iw‑home/local/config/wft/default/author_submit.wft


      then you would specify the value:
      path="default/author_submit.wft"


Specifying Template Access


You can configure access to each template listed in the available_templates.cfg file by using any combination of the following categories:

  • Command
  • Role
  • Group
  • User
  • Branch


The categories can be combined using boolean terms such as AND, OR, and NOT to include and exclude those that meet the inclusion or exclusion criteria you configure. Template access is configured within the allowed element, which is a subelement of template_file:


Within the template_file element is the allowed element, where you can configure user access by matching workflow commands with user roles:


<template_file ...>
  <allowed>
    ...
  </allowed>
</template_file>

Command Access

Workflow commands are specified by the command element. The command element specifies the user-activity that starts the corresponding workflow. For example, the following configuration:

<command name="submit"/>

specifies that the associated workflow is started when performing a Submit and that it cannot be invoked by other means.

The valid command values that you can associate with a workflow are:

  • submit (submitting files)
  • assign (assign button or menu item)
  • new_job (new job)
  • new_TFO_job (new job, in TeamSite FrontOffice)
  • tt_data (saving FormsPublisher data records)
  • tt_deletedcr (deleting FormsPublisher data records in ContentCenter Standard only)
  • all (all possible values from this list)


  • Note: The tt_data command is valid in ContentCenter Standard and can be configured in ContentCenter Professional; see the User Interface Customization Guide. The tt_deletedcr command is only valid when users are using the ContentCenter Standard interface; in ContentCenter Professional, this command is not valid and data records are treated like any other assets.


Role Access


Access based on TeamSite roles is specified by the role element’s name attribute. For example, the following configuration:

<role name="author"/>


specifies that if the user is logged in as an Author.


Group Access

Access based on user groups is specified by the group element:

<group name="marketing"/>


User Access

Access based on individual user name is specified by the user element:

<user name="jdoe"/>

Branch Access
Access based on TeamSite branch is specified by the branch element:
<branch="/default/products"/>


Combining Access Categories

Pairings of individual or multiple access elements can be included or excluded using the and, or, and not elements within the allowed element. You can use boolean logic to create combinations of categories that can either have access to a specific template, or be excluded from it.
In the following example:

<template_file name="Author Submit" path="default/author_submit.wft">
  <allowed>
    <and>
      <command name="submit"/>
      <or>
        <role name="author"/>
        <role name="editor"/>
        <group name="marketing"/>
        <and>
          <role name="admin"/>
          <not>
            <user name="jdoe"/>
          </not>
        </and>
      </or>
    </and>
  </allowed>
</template_file>


the following individuals have access to the Author Submit workflow:


  • Those who are authorized to perform submit commands.
  • Those who have the author or editor role.
  • Those who are members of the marketing group.
  • Those who have the admin role, with the exception of the user jdoe.


If no access category is specified, it is assumed that category has full access to the workflow template.


Regular Expression Support


You can use regular expressions when specifying branch element constraints within available_templates.cfg to search for a specified pattern and specify what to do when matching patterns are found. Using regular expressions allows a greater level of flexibility when adding items.

For example, if you want only the users in the three administration_1 branches (a1, a2, and a3) to access a workflow template, you can set the following constraint:

<allowed>
  <or>
    <branch name="/default/main/administrator_1/a1"/>
    <branch name="/default/main/administrator_1/a2"/>
    <branch name="/default/main/administrator_1/a3"/>
  </or>
  ...
</allowed>


If a new branch called a4 is added to /default/main/administrator_1 you could manually update the available_templates.cfg file to allow access for users in the new branch by adding the branch element to the existing ones:


<branch name="/default/main/administrator_1/a4"/>


Or you could modify the available templates.cfg file to use the following regular expression and, thus, automate the constraints placed on the a4 branch:


<allowed>
  <and>
    <branch name="/deault/main/administrator_1/.*"/>
  </and>
  ...
</allowed>


This regular expression allows users from any branch under /deault/main/administrator_1 to have access to the template.


Path Separators


When using regular expressions, the path-separators (“\”, “\\”, “/”) are all translated to “/” in both the pattern and the string to match against before attempting the match.
In the following example:

<branch name="foo"/>


any branch path that includes the string foo will be matched. Here the following examples match:


/default/main/food/...
/default/main/barfoo/...


In the next example:


<branch name="^/default/main/foo"/>


any branch path that begins with the value-string will be matched. Here the following example matches:


/default/main/food/...


while this one does not:


/default/main/barfoo/...


The following examples are all treated as identical on both Windows and UNIX.


<branch name="^/default/main/foo" include="yes"/>
<branch name="^\default\main\foo" include="yes"/>
<branch name="^\\default\\main\\foo" include="yes"/>
<branch name="^/default\main\\foo" include="yes"/>